
Sign with an offline root
A root CA signs only other CAs and its CRL. If its key is stolen, you must touch every client that trusts it, and a root cannot be revoked. So the key should live where nothing reaches it: on a machine that is switched off or off the network, and the server gets only the root’s certificate.
- When to use this
- How it fits together
- 1. Make the root and import its certificate
- 2. Create the intermediate
- 3. Sign it on the offline machine
- 4. Upload the certificate
- 5. The root’s CRL
- Planning the root’s life
- Check it worked
- When it fails
- Next steps
When to use this
- You set up the PKI and want the recommended layout: an offline root and an online intermediate.
- You add or replace an intermediate below an offline root.
- The root’s CRL is due. Nothing renews it automatically.
How it fits together
| Where | What happens | What moves |
|---|---|---|
| Server | Creates the intermediate’s key and a certificate request, and writes an OpenSSL extension file that says exactly what the CA certificate may do | Out: <name>-<generation>.csr and .ext (both public) |
| Offline machine | Signs the request with exactly that extension file. The extensions inside the request are never copied. | In: the two files. Out: <name>-<generation>.crt |
| Server | Checks the signed certificate against its order and activates the CA | In: the certificate |
No private key ever travels. The root’s key stays on the offline machine.
1. Make the root and import its certificate
On the offline machine, create the root with pki.sh from legacy/ (./pki.sh init --org "Homelab";
legacy/README.md lists a single-file build, dist/pki-standalone.sh, for air-gapped machines). Plan its
lifetime now: the default of pki.sh is 7300 days, and the root must outlive every intermediate below
it. Protect the key with a passphrase and keep a copy of the machine’s disk or directory in a safe place.
In the UI open Certificate authorities → Import offline root. Give the same name as on the offline root, paste the certificate and the public base URL, and import. The page then names the SHA-256 fingerprint. Compare it with the one the offline machine shows: this import decides what the server trusts. The base URL goes into every certificate below this root and can never be changed.
2. Create the intermediate
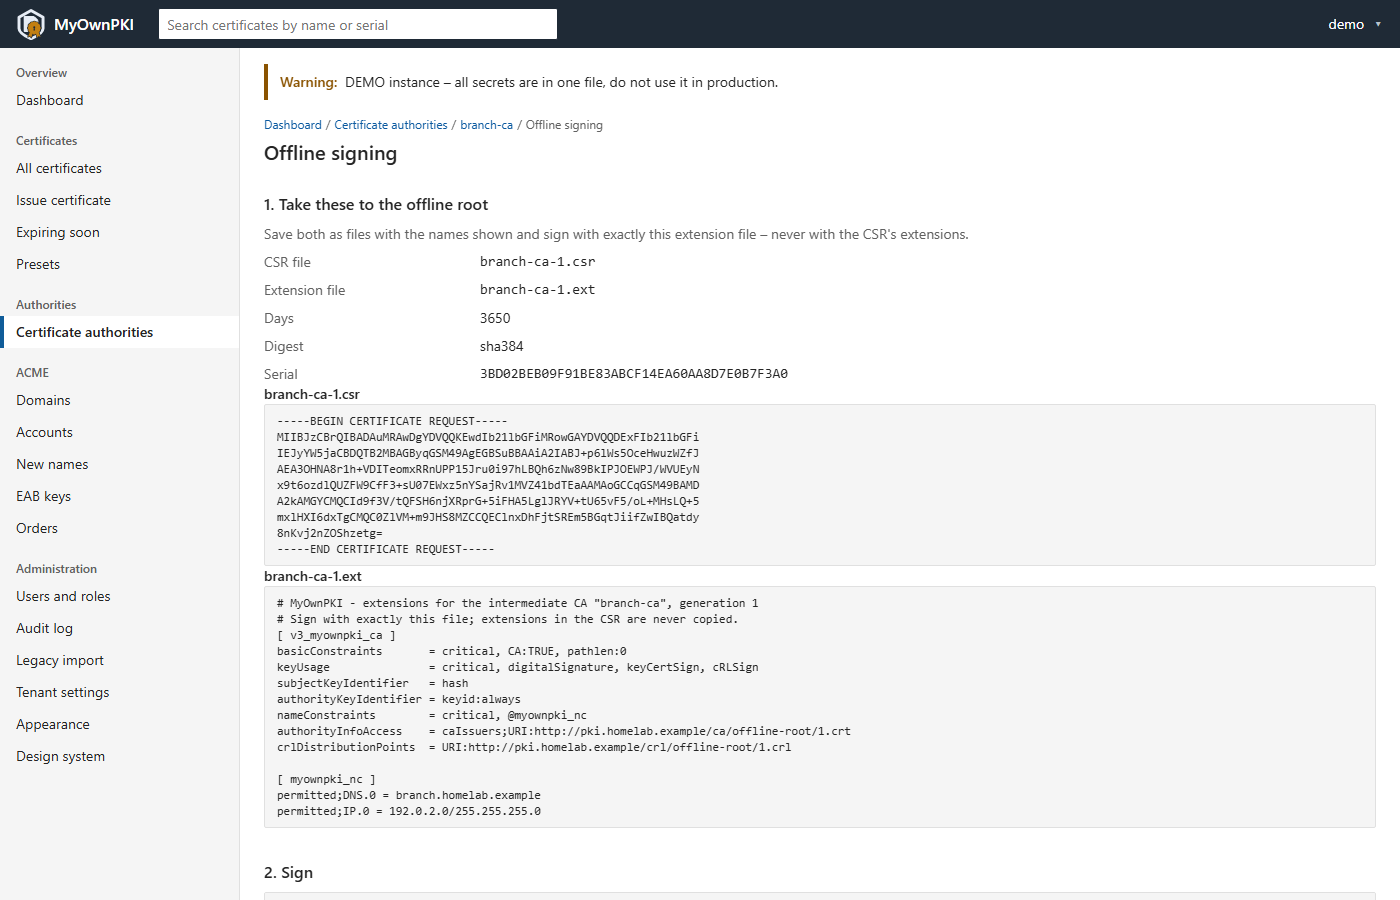
Certificate authorities → New CA, parent = the offline root. Give a name, a common name, name constraints for your own names, and the key algorithm. The CA is listed as Waits for its signature and the page Offline signing opens. It shows the request, the extension file and three values: the days, the digest and the serial.
3. Sign it on the offline machine
Copy the .csr and .ext files over (a USB stick is fine). Before you sign, check that the subject
in the request is the one you ordered, and read the .ext file: it must show CA:TRUE, the pathlen and
the name constraints you chose.
openssl req -in issuing-1.csr -noout -verify -subject
With pki.sh as the offline root, use the values the page shows:
./pki.sh ca-sign issuing-1.csr --ext issuing-1.ext --days 3650 --out issuing-1.crt
It checks the signature of the request, refuses a .ext file without the v3_myownpki_ca section,
refuses --days that would end after the root, and signs with openssl ca, so the certificate is
recorded in the root’s database. That matters if you must revoke this CA later. With plain OpenSSL
(3.0 or newer; macOS ships LibreSSL, use brew install openssl@3) the page prints the exact command; it
records nothing in a database:
openssl x509 -req -in issuing-1.csr -CA root.crt -CAkey root.key -copy_extensions none -extfile issuing-1.ext -extensions v3_myownpki_ca -days 3650 -sha384 -set_serial 0x<serial> -out issuing-1.crt
Check the result before it leaves the machine:
openssl x509 -in issuing-1.crt -noout -subject -issuer -dates -ext basicConstraints,keyUsage,nameConstraints
openssl verify -CAfile root.crt issuing-1.crt
4. Upload the certificate
On the Offline signing page paste the PEM into step 3 and choose Install certificate. The server
checks it against the order: the key, the subject, CA:TRUE, the key usage, the path length, the name
constraints, the EKU limit, the authority key identifier of the root, an unused serial, a validity inside
the root’s, and a SHA-2 or Ed25519 signature. Anything else signed offline is refused. On success the CA
is active and has signed its first CRL.
5. The root’s CRL
The root cannot sign its own CRL on the server. Create it offline, then upload it on the root’s page, Upload the root’s CRL:
./pki.sh crl --ca root
The form takes the PEM text, so paste the contents of publish/root.crl.pem (publish/root.crl is the
DER copy). With plain OpenSSL, openssl ca -gencrl needs the root’s index.txt and crlnumber; the
Offline signing page shows the commands. The server accepts only a CRL with a higher CRL number than
the newest one it has, signed by the root, without a delta or an unknown critical extension.
The server plans with 180 days for an imported root’s CRL unless you set another value at the import,
but pki.sh signs for CRL_DAYS of its pki.conf (30 by default), so set that to the lifetime you want.
Renew the CRL before half of its actual lifetime has passed: the crl alert warns at that point and
turns critical once the CRL is past its next update, and
then clients that check revocation reject every certificate below the root. Put the next date in a
calendar.
Planning the root’s life
- The
ca_expiryalert warns 90 days before a CA ends and is critical at 30. Plan a renewal years ahead. - Renewing an offline root means a new key under the same name and subject, imported again with
Import offline root. It becomes the next generation, and the page warns that it is a new trust anchor:
every client needs it before certificates below it are used
(CA lifecycle). Renewal with the same key is refused.
The product documents only the import side; how to create the new key and certificate with
pki.shis not described here. Note thatpki.sh renew-cakeeps the key, so its result would be refused. - An intermediate ends before its root. The server caps the days it shows you accordingly.
Check it worked
- Certificate authorities lists the intermediate as Valid, with the root as its parent and Offline as the root’s key storage.
-
On the server, the chain is complete:
runuser -u myownpki -- /usr/local/bin/myownpki ca show issuing --config /etc/myownpki/config.yaml -
The root’s CRL is served; print its number and next update:
curl -sS http://pki.homelab.lan/crl/root/1.crl | openssl crl -inform DER -noout -crlnumber -nextupdate
When it fails
- The upload is refused: the message names which part of the order the certificate breaks. The most
common cause is signing without the
.extfile. Sign again with exactly that file. - ”–days would end after the Root CA”: use the smaller value the page shows.
- The CRL upload is refused: its CRL number must be higher than the newest one and it must be signed by this root.
- A
crlalert is open: sign and upload a new root CRL. - More: Troubleshooting and Monitoring.
Next steps
- Issue the first certificate: Installation.
- Replace or renew CAs: CA lifecycle.
- When an intermediate must be revoked at the root: When things go wrong.